
In case it wasn’t clear from my recent cameo on some RadioShack fliers, I’ve been having a bunch of fun with LittleBits‘, more sophisticated modules recently. A few months ago, I posted a project showing how to use the CloudBit to connect your umbrella stand to the internet. This latest project leverages the LittleBits Arduino Bit, a small linux computer (like a BeagleBone, Raspberry Pi, or UDOO), and the Philips Hue Hub to easily control the state, brightness, and color of your Hue lightbulbs via a tactile interface.
Here’s a quick video showing this project in action:
This project is open source hardware and software. Read on to learn how to make it, and to learn more about how it works!
How it works…
The system architecture of the LittleBits Hue Lighting Controller is pretty simple, but I put a lot of thought into making the system robust, fast, and easy-to-setup. I’ve actually been using this controller daily for the last several months, but I completely rewrote most of the code in preparation for sharing it here – most notably, I built an automated setup routine, added serial device auto-connect logic, and made the system more robust against hardware state changes (like suddenly unplugging the controller from the attached linux computer).
Here’s a diagram that explains how the system is setup:

There are really only three components to the system – the control pad, the linux machine, and the Philips Hue network. When you press buttons or turn the dial on the control pad it sends serial commands to a script that’s running on the linux machine. The script interprets the commands and talks to the Hue hub over the local network to instruct it to change the lights. When you’re setting up the system, you’ll use a automatic setup mode that I’ve included in the Python software. The script handles configuring the linux machine to automatically launch the listening service on boot, it creates the secure connection with the Hue hub, and it allows you to select which lights on your Hue network you’d like to control with the control pad. The Python script also automatically identifies the right serial device and will automatically handle reconnecting the serial interface on USB disconnection events. You don’t have to know anything about configuring Linux serial devices to make this software work – it’s all automatic. It will even work on systems that have multiple USB serial devices attached (even multiple Arduino Leonardo boards – the LittleBits module identifies itself as an Arduino Leonardo).
Make it!
Ready to make one for yourself? You need to gather materials, get everything assembled, wire it all up, and program the Arduino and the Linux machine. The GitHub ReadMe for this project has all the detailed instructions that you should need. You’ll want to visit the GitHub page directly too, so you can download the source code and 3D designs! The detailed ReadMe instructions are embedded below:
The LittleBits Hue Controller is an easy-to-setup, wall-mountable, physical controller for your Philips Hue lightbulbs. The controller makes it easy to turn the lights on/off, change their brightness, and cycle through preset colors. This is a great project for people who hate having to pull their phone out every time they want to adjust their lights.
- Some LittleBits!
- An always-on Linux Machine. This can be a Raspberry Pi or something similar. These instructions assume a debian-based distro, like Ubuntu or Raspbian.
- A Phillips Hue Hub, and one or more Phillips Hue Bulbs
- Two Micro USB Cables (Right Angle is best)
- A 3D printer (optional, for making the enclosure)
- 4 sets of M3x10 Socket Head Bolts and Nuts (for assembling the enclosure)
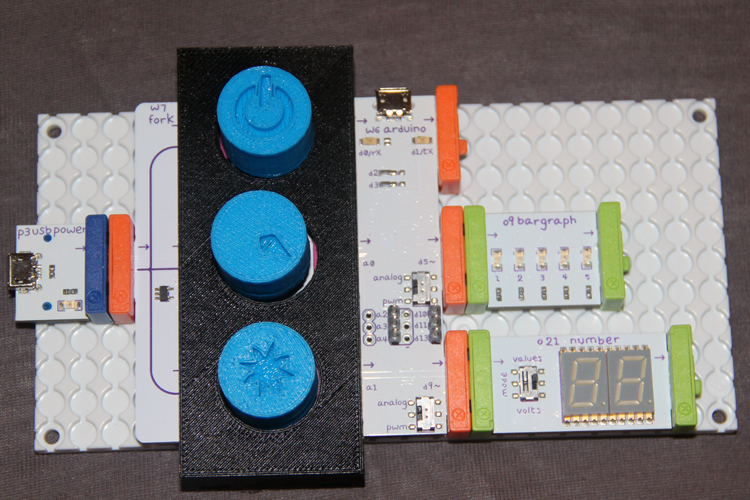
Step 1: Place the Bits on the backer board as shown. Print the button/dial covers. Slightly heat the button/dial covers and press them onto the buttons and covers as shown.
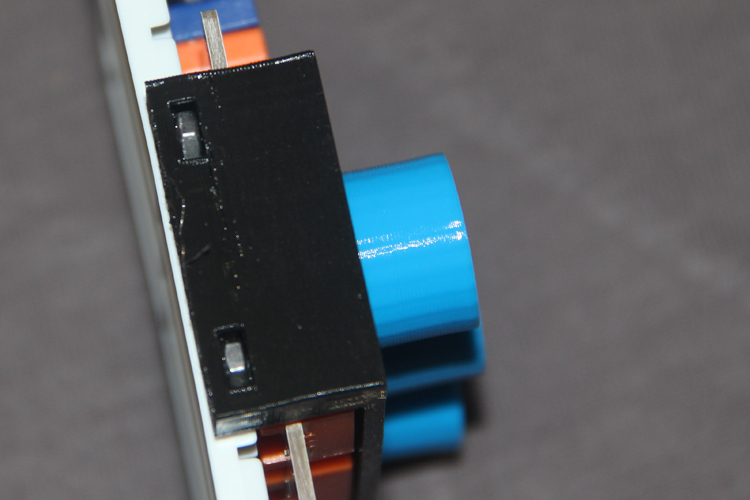
Step 2: Print the enclosure. Place the front of the enclosure on the panel as shown.
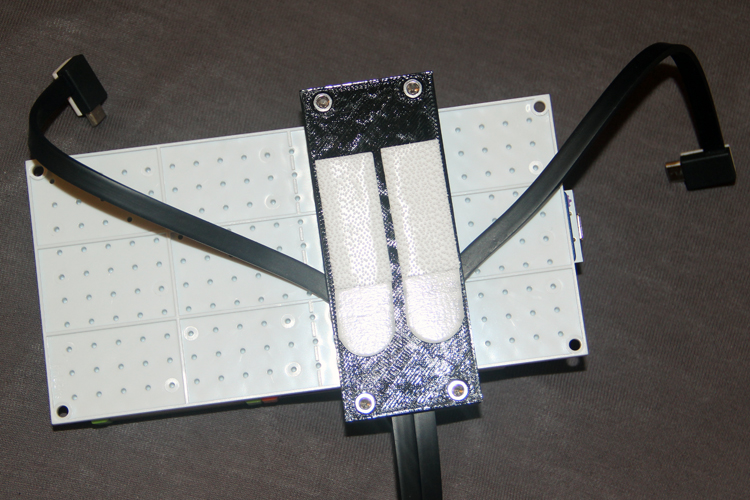
Step 3: Press the four M3 nuts into the four slots on the top cover as shown.
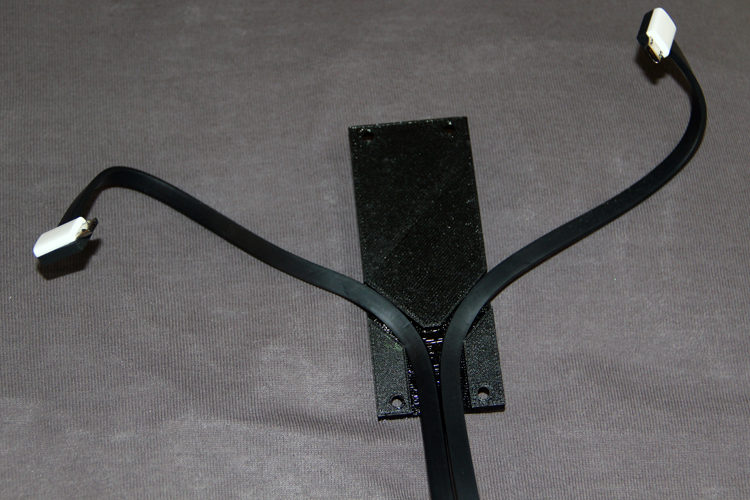
Step 4: Place the USB wires into the cutt-out on the rear of the panel as shown.
Step 5: Screw the bolts into the nuts and apply a velcro backer as shown.
- Provide Power to the controller, and connect the Arduino cable to your computer (workstation computer, not the linux server computer)
- Use the provided Arduino Sketch to program the Arduino Bit via the Arduino IDE (select Arduino Leonardo from the device menu)
- Log into (locally or via SSH) to the network-connected, always-on linux machine that you'll use (Raspberry Pi is good for this)
- Install Python 2.7 if don't already have it installed:
sudo apt-get install python2.7- Install Python PIP if you haven't already:
sudo apt-get install python-dev python-pip- Install the PHue Library:
sudo pip install phue- Install the PySerial Library:
sudo pip install pyserial- Install the CronTab Library:
sudo pip install python-crontab
- Stay logged into your network linux machine
- Connect your LittleBits Hue Controller to power, and to a USB port on your linux machine
- On your linux machine, navigate to your home directory, and clone this GitHub repo:
git clone https://github.com/sciguy14/LittleBits-Hue-Controller- Navigate to the server script directory:
cd LittleBits-Hue-Controller/server- Ensure the script is executable:
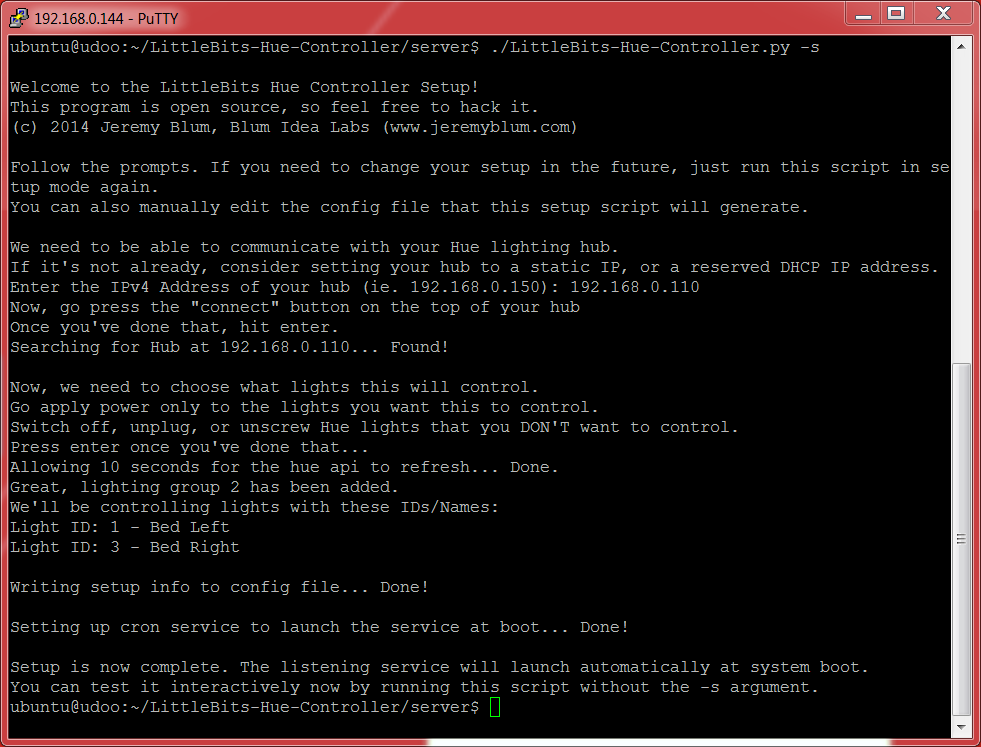
chmod 755 LittleBits-Hue-Controller.py- Execute the script in setup mode and follow the instructions to automatically setup the system:
./LittleBits-Hue-Controller.py -s. The output will look something like this:
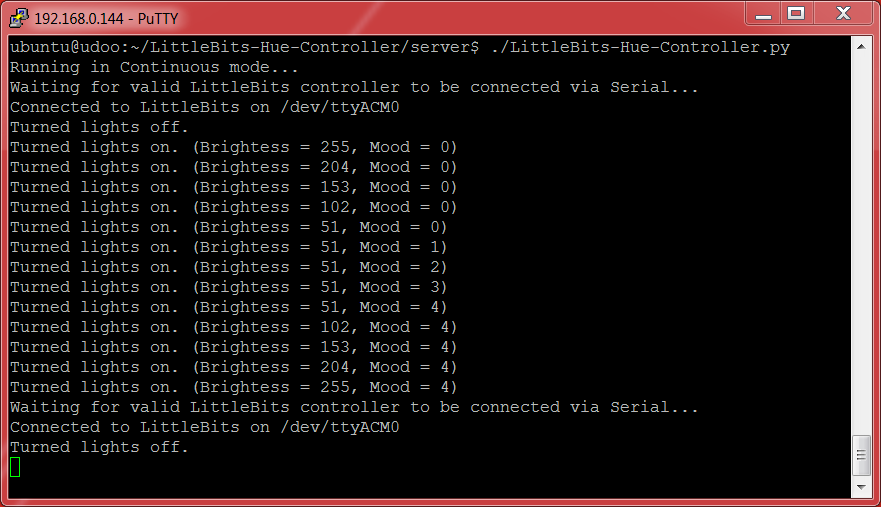
- That's it! The handler script will now automatically run in the background at boot. You can launch it immediately to observe its output as you toggle the controller, by running:
./LittleBits-Hue-Controller.py. The screenshot shows the behavior as I adjust brightness, color, and state via the control pad. You can also see it automatically recover when the control pad is unplugged and plugged back in:
This work is licensed under the GNU GPL v3. Please share improvements or remixes with the community, and attribute me (Jeremy Blum, http://www.jeremyblum.com) when reusing portions of my code.

Supporting Code and Designs
The LittleBits Hue Controller is released as entirely open source hardware and software. All materials are distributed under the GNU General Public (Open-Source) License. Please Attribute and Share-Alike. All files are hosted on GitHub.
![]()


23 comments
This is pretty cool. Thank you for sharing. Will give it a try. Happy Holidays!
This is really awesome, thanks for explaining it so simply that even a beginner like me can do it! I can’t wait to try this.
sir,we have a ditinct project based on wireless comm. with zigbee+arduino.
can you please help us
I’m confused maybe I’m hopeless but I wanted to do this with my 11 yo son so be patient please; I don’t understand what you want in the first step “Program the Arduino Bit” how does that fit into this step??? “Obtain and Setup the Server Script”.
The article assumes you have some familiarity with Arduino. In the “program the arduino” step, you need to load the arduino “sketch” onto the LittleBits Arduino module. This sketch will then run indefinitely on the Arduino and will communicate back-and-forth with the linux machine that you will eventually attach it to. If you have no familiarity with programming an Arduino, please check out my tutorials on that: https://www.jeremyblum.com/2011/01/02/arduino-tutorial-series-it-begins/
I really like your arduino tutorial videos, and I don’t know if this is the right place to ask but please help me with edof camera interfacing with arduino. I took out 5mp camera from nokia x2-00, it had an extremely small code/partno on it (that needed a powerful magnifier): 1953 KOLD 1073. I could not find a ds for this part, but I found ds of VX6953CB whose structure is almost exactly similar. Its a 100-page ds with so many registers, I am confused.
All I need is a simple video feed to pc(of any bad res if 5mp not possible with uno, black-white will do) or atleast picture capture. VX6953CB has SDA, SCL pins.
Hi Jeremy! We would like to feature this project on our site EEWeb.com. If you are interested, kindly drop me a message on my business e-mail: [email protected]. I’ll be looking forward to your response! Thanks.
Hi,
I have Arduino Yun, should ne also possible to do this. Can you give some direction? How difficult this would be? And best way to start?
Thanks,
Olaf
What an awesome project ! I was working on something similar but I gave up, but now seeing in action, I’m gonna continue my project ! thanks !
Ohh My god! your projects really cool! I really like this! Really..
thanks for sharing and keep up the good work!
Thanks for awesome article, i realy like this project. Thanks for sharing.
Very nice. It’d be fun to see if you could spin this off in to a home automation control hub or something. Add a Nest thermostat and you’re half way there with AC and lights.
I did :)
This is a great home automation project! But i recommend the home automation project with Arduino Uno and the ethernet shield to control lights and stuff in your room or house. You can find a simplified home automation project at ( http://www.thearduinoscene.com/using-the-arduino-ethernet-sheild/ ) It’s a pretty good tutorial and the code is included!
This is a great automation project!I also want to make a try.Really cool.
It’s a pretty good tutorial! I really like your project.
“””It was really insightful.
Thanks for the info.
Wanna have more contents from you.
Cheers””””
the affiliate links no longer work hence your links to the actual sites where the hardware is from don’t resolve either.
Could you replace with “normal” links?
fixed!