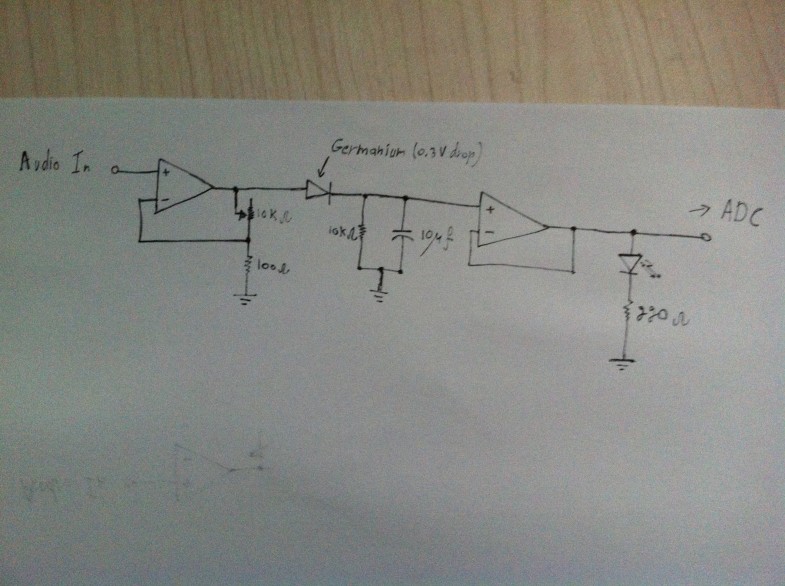
This is one that I’ve been excited about for a long time. When element14 asked me to put together a holiday special, I knew just what to do. This episode is the most technically complex so far; it covers non-inverting op-amp circuits, low-pass envelope detection filters, buffers, power management, and some clever programming. Because of the complexity of the project, fellow Cornell Engineer, Brian Schiffer (whom you might remember from this article where we were both featured) co-hosted this tutorial with me. The end result is pretty spectacular – a chain of 50 LEDs reacting dynamically to music. The twist, however, is that the chain propagates color information from the center, resulting in a temporal visualization of the music. The schematics, programs, and parts list are available for download below:
You can download the files associated with this episode here: Arduino Tutorial 14 Files
Source materials for all my arduino tutorials can be found in my github repository.
![]() Distributed under the GNU General Public (Open-Source) License.
Distributed under the GNU General Public (Open-Source) License.
Please Attribute and Share-Alike.
Update (9/2/2013): The code has been updated to reflect the new naming convention for the Adafruit LED Library.
Update (12/18/2012): Check out this system installed in a Car by Gyurma
Update (12/15/2012): The Adafruit Library has been updated, and will necessitate a small change to the code. Check out this comment thread for more info.
Update (12/2/2012): Some viewers have suggested improvements to this circuit that have worked well. If you’re having troubles with the circuit I presented, try out this circuit, by John Basila. Open Source Education wins again!
Update (6/9/2012): Check out this version made by Steved: http://youtu.be/iYxLQxpBTJ8
168 comments
Hey Jeremy,
Great tutorials! I am an arduino newbie (done a couple projects) and I want to dabble into this one. The breadboard suggested for this project (GLOBAL SPECIALTIES – PB-103 – BREADBOARD) is pretty pricey!!
Is there a reason you suggest this guy? Can I use a substitute e.g. http://www.ebay.ca/itm/Mini-MB-102-Solderless-Breadboard-Protoboard-830-Tie-Points-2-buses-Test-Circuit-/360752923307?pt=LH_DefaultDomain_0&hash=item53fe8cc2ab&_uhb=1
Thanks!
Yes, that’s fine.
sir plz help us for using the normal LED STRIP which operates on 12 V, 1.5A
u can find the strip on e-bay, some of us used it but its now working, i think that because all LEB STRIPS have Common CATHODE. u r using common anode,
so plz help us!
Duke: How many amps is your power supply? I’ve noticed problems of the programming getting stuck or crashing with high LED counts if your are not supplying enough amps for the LEDs (and the power supply is also powering the arduino). Switching in a higher amp supply generally fixes the problem as many LEDs will be drawing most of the current and not leaving a consistent supply for the Arduino.
Sanajay: You have the incorrect LED strip. You need one that is individually addressable (every LED has a micro-controller). The micro-controller for this tutorial is the WS2801. So acquire a strip that uses those and you will have a better chance of getting this working.
Hey Jeremy,
I have built circuit according to the schematics you provided, however its not working. When I plugin in the headphones into the jack the two leds go out. Having a hard time trying to trouble shoot it. This is what my board looks like.
http://postimg.org/image/7duxaqgmt/
http://postimg.org/image/k2aytvb4z/
Dave,
Can you clarify something, because you mention you are plugging in headphones to the jack? The jack on the circuit (the breadboard) is for a line level audio input, it is not an output.
It looks like your circuit is working because when you plug into the input, the LEDs go out, this is expected behavior because they will now only light up when receiving an audio signal. Try plugging in an ipod or other audio device to the jack and try that. Apologies if I misinterpreted and you already are doing so, in which case try adjusting the potentiometer trimpots (input sensitivity).
Wow it was only that, thanks so much! The proof is in the pudding.
Awesome work Dave, and thanks for helping out, CymaSpace!
Hey Jeremy,
I’m a college student at SUNY Fredonia and I need some help with a project. I’m in a Lighting and Sound class and I need to make a prop that lights up for class. This task simply isn’t enough for me. My idea is to make gloves that light up at the tips of the fingers and either change colors or blink to beats in music. Do you have any pointers or ideas that I can do? Also, can I make this setup wireless? As I said, they’re gloves, so I don’t want wires and things to get in the way of the light show and the movements. Thank you so much for reading this and I hope to hear back from you soon! The project is due in a couple weeks so I really do hope to hear back from you soon!
Anthony Schroeder
Anthony,
You’ll probably be interested in checking out wearable electronics that support Arduino IDE using. For example the Adafruit Flora and Gemma. This handy tutorial for a sound-reactive tie would probably get you started on your way: http://learn.adafruit.com/led-ampli-tie/overview
Thank you so so so so much CymaSpace for that help! That saved me lots of time and confusion!
Ciao Jeremy,
I’m writing from Italy and I’d congratulate you on the tutorial.
Two main questions before to begin the project:
1) I’m a little bit confuse on the way I can feed audio to the Arduino in order to be processed (minutes 12.23 of your video) . Is it correct if a take the signals and grounds of the two headphone wires and bring them into the arduino in order to be sampled? or I’ve to build and audio jack at the and of the Headphone cable and feed it to Phono Jack you mentioned in the Part list?
2) May I use another type of led strip to cheape my project? (e.g: http://www.ebay.com.au/itm/1-10M-3528-RGB-LED-Strip-300leds-SMD-Led-light-IR-controler-Power-adapter-/261392401551) Any idea is well accepted!
Thanks in advance!
Giorgio
Hello Giorgio,
for your questions:
1) The Voltage of the sound coming in is very low and cannot really do much. It can work, but you won’t get good results. It’s best if you did the amplification according to the tutorial.
2) The link you provided shows a led strip that is not addressable, which means you cannot control a specific led in the strip.
Hello John,
thanks for your prompt answer!
1) Yes my intention is of course amplify the audio signal but I was also wondering if the signal has to be provided hardwired or through the input Jack? This is because in the part list is present an audio Jack which can be used in the board but in the video I cannot see it.
2) Ok now I see the difference! Maybe I can buy a simpler strip led(or use simple RGB led) but of course I have to modify the code.
Thanks in advance.
1) No need for an audio jack, you can connect the wire directly to the amplifier.
Thank you again John.
I’ve just bought the necessary components without the part related to the strip led just to see if I’m able to read the signals…I will let you know the progresses.
Have a nice day!!
Giorgio
yes! whats what i m looking for plz any one help us!
i m using the RGB LED Strip from EBAY as well-http://www.ebay.in/itm/5M-RGB-5050-non-waterproof-150-LED-Strip-24-KeyIR-Remote-Controller-Power-Suppy-/161200415717?pt=LH_DefaultDomain_203&hash=item25884b23e5
and its use 12V.
Hello John, Jeremy, folks
I want to share with you my experience with this project.
In order to see the DC behavior of the circuit I have removed the parallel RC components between buffer and LED and after supplying with Arduino 5V the opamp, I see the led turned on also without having any voltage in the V+ pin of the inverting opamp. In fact at the buffer input I read 3.62V rather than to have 0V as per my expectation!!
Is this something missing in my knowledge (like e.g some particular path in the circuit) or it can be something wrong in the circuit connection?
To meet your needs I posted the schematic with the equivalent voltage I acquired in the circuit and a picture with the actual connections.
http://postimg.org/image/yr7p70669
http://postimg.org/image/vln3gsnk1
Looking forward for you answer,
Best regards.
Giorgio
First off, really cool project.
I built it all and pushed into onto a little breadboard to reduce the size. I have the green and red LEDs flashing to the music. I’m having issues with getting the LED strip to work though.. I’m guessing that it’s because I went cheap and bought this LED strip off of Amazon:
http://www.amazon.com/SUPERNIGHT-16-4Ft-Waterproof-Changing-Flexible/dp/B00APDU516/ref=cm_cr_pr_product_top
The power supply is 12v/1Amp, so I cut the LED strip down to about a meter to see if maybe that would help out.. Nope. Still not working.. Does this sketch only work with the Adafruit LEd strip?
Update: I changed the power supply so that it powers only the LED strip. I can faintly see the red and green lights in the strip, but changing the gain on either channel doesn’t affect it at all..
Chris,
Unfortunately, the LED strip is a critical piece of the design that you can’t skimp on. This is because it needs to be a Digital RGB strip (where each LED is individually addressable).
The sketch and library is designed to work with digital LED strips that have the WS2801 chip in them. The Adafruit strand is based on this chip: http://www.adafruit.com/products/322
I would do a product search for WS2801 LED strip and purchase the right kind. You don’t want the WS2811 (or WS2812b) strips because they require a different set-up (only one data pin & very, very timing specific) which requires using a different library & modified code.
Great project- I’ve thoroughly enjoyed your Element14 videos as well as your book. I’m still new to Arduino and programming. I’ve ordered a ws2811 RGB LED strip from Adafruit- but I note that the strip you use is a ws2801 (different chip and 1 extra wire). My question is- can the opamp you’ve designed also work with the ws2811 strip I’ve ordered? I read that the timing has to be very specific for the ws2811 chip- but since I’m a newb at all of this… that doesn’t mean much to me. Any insight you can offer would be appreciated. I have an idea of a project I want to have music synced RGB LED lights with.. and the type of strip that I’ve ordered would better fit the bill than the ones you’ve used. Perhaps if it’s easier to use the ws2801 with your opamp design then I may be able to find a flat strip that’s ws2801.. the “Christmas tree” type strand you use isn’t practical for what I need- that’s why I opted for the strip I ordered. Thanks in advance to any advice given me.
I had some success with switching the code to WS2811. You need download and add the Adafruit NeoPixel library (https://github.com/adafruit/Adafruit_NeoPixel) to your Arudino Libraries folder and then switch out the reference to the WS2801 library in the tutorial code to the NeoPixel one. As far as I can tell, the calls to add the strip, adjust variables and change colors are all compatible with both libraries but I am not sure if it will be exactly compatible. Let us know how you get on.
I have changed the code over to run a WS2812B strip. All the calls made on strip work fine on the neoPixel library.
Would you mind sharing your code for this change?
https://github.com/kroony/arduino-lights/blob/master/UV%20meter/uv_meter/uv_meter.ino
Lines 2 and 6 should get you started.
Hello again- slowly getting closer to working on this circuit. I lucked up and got a free op amp but it’s the LM324AN from Texas Instruments. I’ve tried doing some comparisons of the datasheets for both opamps and I can’t tell a difference between the two. I plan on trying it out with this opamp that I have- any thoughts on if it’ll work or not? I’m completely new to electronics- so there might be a difference that I’m not noticing. Thanks- and thanks Cyma for your reply earlier- sorry I never posted back. But I did get my LED strip from adafruit and now was waiting on the opamp. Really excited to hook my strip up to some music!
hey jeremy,
why i can’t download your software?
how can i dis tutorial?
good day sir,
how can download this tutorial?
can i use other software instead of the software you used?
i hope for your immediate reply. because im planning to make this as my project..thank you sir.!!
The download link is above.
I am new to this and trying it as i go, i copied your schematics and ran a check on arduino software and gives me an error. i copied the adafruit link you posted to the libraries folder and im not getting it to be clear.
Arduino: 1.5.6-r2 (Windows Vista), Board: “Arduino Uno”
sketch_jun27a.ino:20:29: error: Adafruit_WS2801.h: No such file or directory
sketch_jun27a:31: error: ‘Adafruit_WS2801’ does not name a type
sketch_jun27a.ino: In function ‘void setup()’:
sketch_jun27a:39: error: ‘strip’ was not declared in this scope
sketch_jun27a.ino: In function ‘void loop()’:
sketch_jun27a:63: error: ‘strip’ was not declared in this scope
sketch_jun27a:71: error: ‘strip’ was not declared in this scope
This report would have more information with
“Show verbose output during compilation”
enabled in File > Preferences.
This was the error it sent me. if you can help me i greatly appreciate it.
So I’ve got everything wired up, and the LEDs on the board are working great. I’m was browsing through the Adafruit store, and I happened across this strip: http://www.adafruit.com/products/306. Can this be used (with the new libraries, of course) instead of a WS2801 based strip? It’s a little bit cheaper and briefly reading through the description it seemed like they are pretty similar.
Thanks!
Hi Guys, I’ve managed to modify take1 sketch to work with ws2812 based 300 pixels 5m LED stripe using Adafruit NeoPixel library. It works pretty well as to my point of view. However I wanted to make take2 sketch workable as well as it is more spectacular. I failed so far with this effort and probably you can suggest on what could be a problem. I inserted series monitor for debugging the same way as in take1 and found out that there is no analogue input reading at both channels despite the pin setup is the same. I suspect that the whole loop cycle is not executed for whatever reason, maybe it is connected with big pixel number and delay parameter should be adjusted in certain way, but I didn’t find it so far by experimenting. Sketch compilation shows no errors, but it doesn’t work, I can attach both sketches I’ve modified if it could help, just let me know.
Hi there! The reason of stucking is found. Obviously there is not enough SRAM in Arduino Uno (and consequently others with the same memory banks) to keep the data for all 300 pixels to be showed by the strip. Experimentally I’ve found that max number of pixels is 236 in this sketch, with bigger number it stucks. I think that using of compressed uint massive instead of uint32 before sending to the strip could save somewhat 300 byte of SRAM. Any comment on that?
If you could put the modified code as a comment that would be cool,was just wandering if it could be modified for the single data line led’s :)
Hey Jeremy,
whether this device can drive APA104 led, here is datasheet
http://www.greeled.net/uploadfile/03/60/6003/21141/10/21/apa104-greeled
I’m still waiting for the light strip to come in the mail, so I thought I’d just test out creating the phono jack + led configuration. I set up the left channel exactly to how the breadboard schematic, but I find that when I plug in the Arduino, the LED turns bright red. It doesn’t matter if I put in the audio input or not.
What might be going on?
http://postimg.org/image/ibqfvezqp/
Of course, it does work with the actual sound coming in, so this is a conceptual question.
If the input doesn’t have a audio input plugged in, then it’s said to be “floating” and you can’t really count on the circuit to do what you would expect. The audio input connection introduces a known voltage (0 when no sound is playing) connection between the positive op-amp input and GND that we then amplify. Try connecting the input to GND and you should see the LED turn off.
That makes sense! Thanks.
Hi, Great video. Got all the stuff to try it out except i’m still looking for power. I found that my Samsung tablet wall charger output is 5.3V 2.0A, will that work? and if so, I will buy an cheep USB cable to plug into it and chop off the other end, but will it have more than power and ground if I do that? I’m new to this, can you tell? haha
Hey guys,
Thanks for the video and the schematics its really helpful!…Although when I got my WS2801 LED strip from the website given in the parts list.pdf (only doing 25 so I only need 5V 2A wall wart power supply) there are only two wires (red and blue) exposed out of the strip itself from the ribbon connector; which I guess connects two 25 LED strips in a daisy chain fashion??..But that doesn’t make sense are these just power and ground coming out of the strips?? Where are the clock and data lines?????
So my confusion is in the video you mention there are four wires for clock, data, power, and ground. You also don’t go over how you’re connecting the strip itself to the arduino or power supply you only show the power supply that you salvaged and then just go straight into the breadboard and coding….assuming that we all have the same exact strips that you do. And the strip I got has only a red and a blue coming out of the connector so I don’t want to put power on a wire that is supposed to be clock, data, or ground for that matter..
There are 4 wires all chained together in the strip I got, do I just put a wire from (power and ground from wall wart and clock and data from arduino) into the female end of the strip connector that has blue, green, yellow, and red? Is the connection properly terminated this way? Not to mention there is one blue that is tied to the connector going all the way through each light and an additional blue just exposed out of the connector not connected to anything (same with the red). The data sheet doesn’t say anything about which wire is which; only shows pin-out of the chip associated with driving the LED. Do I need to just take the connector off and solder some wires together? Very confused and I don’t want to push 2 amperes on a line that isn’t meant for receiving power let alone just randomly see which wire is which. Don’t feel like waiting a couple weeks just to get a new strip because I burned the one I have.
Looking forward to hearing from you!
Anders
Hey Anders, these web pages from Adafruit may be helpful:
Power: https://learn.adafruit.com/12mm-led-pixels/power
Wiring: https://learn.adafruit.com/12mm-led-pixels/wiring
The blue and red wires are for power. If you have the female DC power adapter, you can hook it up to that.
You should see something on the end of the four wires that looks like a black connector. If you want to hook up the yellow data line and the green clock line to your Arduino, you can either stick jumper cables into the connector directly, or you can use the mating connector.
Check the web sites since they have pictures and more detailed instructions. Hope I understood your problem correctly and hope this helps.
nevermind i fixed it….works great!
Hey Mr jeremy … I built the circuit it worked , the two red and green LED that are in the board is working , however the LED strip didn’t worked …. I guess because I have 12 v 2 A RGB LED Strip ….. any help regarding this problem plz …
I think this project is designed for ws2801 rgb led 5 v … you have no chance except if you bring rgb addressable 5v … thanks
Hey Mr Jeremy can you plz help me .. I have a senior project about this and sure inspired by your creative ideas …… I’m done it but I have a big problem .. I used 12MM DIFFUSED THIN DIGITAL RGB LED PIXELS (STRAND OF 50) .. the problem is I don’t know the wiring of my strand .. I mean I don’t know the vcc and the ground also the data and clock and my wires order is red–> green–> blue–> yellow (not as shown in the zip file ) …. also my strand have 2 ends I think input and output …plz help me I have to finish it during 1 month .. I can send a snapshot if you want
This is great! However ive built everything and the last piece that im stuck at is starting the mirror propagation in the middle of the strip. I am able to have it start in the middle but its only 1 half, i can change directions but can only have propagation in 1 direction at a time. The strip is all lit up but only half is syncing with sound. If I double my length then the whole strip syncs with sound, only from 1 end at a time though? I downloaded your code so it is exactly as you had it. Any ideas?
Hi there Jeremy,
this is just what iv’e been looking for,music activated pixels,
could you modify the code and schematics for those of us that use the single data line led’s the WS2812B type?
would it just be a case of rewriting the code to recognize the different type of pixels or would it be more complex?
Cheers
Stu
success,iv’e converted the code for the single line led’s ws2812 type,
changing the code was easier than i imagined it would be,
here’s the rewritten code for take1 (i’ll try take2 when iv’e soldered up another strip)
//Jeremy Blum’s Arduino Tutorial Series – Episode 14 – Lights and Sound Holiday Special
//Sample Code 1 – Blinking an RGB LED chain to mono music
//https://www.jeremyblum.com
//WS2801 Library and Helper Functions by Adafruit http://www.adafruit.com
/*
The circuit:
* A0 from Amplififed Left Channel
* A1 from Amplified Right Channel
* Digital 6 to Light Data Line
* Don’t forget to connect all your grounds!
*/
//SPI Library
#include “SPI.h”
//RGB LED Library
//You can download it here: https://github.com/adafruit/Adafruit-WS2801-Library/archive/master.zip
//Install it in your library folder and restart the Arduino IDE
#include
//Analog Input Pins
int left_channel = 0;
int right_channel = 1;
//Light Control Pins
int light_data = 6;
//Library Setup
Adafruit_NeoPixel strip = Adafruit_NeoPixel(35, 6, NEO_GRB + NEO_KHZ800);
void setup()
{
//Initialize Serial Connection (for debugging)
Serial.begin(9600);
//Initialize Strip
strip.begin();
strip.show();
}
void loop()
{
//Print out some Debug Info
Serial.print(“L: “);
Serial.print(analogRead(left_channel));
Serial.print(” R: “);
Serial.println(analogRead(right_channel));
//Set the hue (0-255) depending on left channel value
byte hue = constrain(map(analogRead(left_channel), 0, 400, 0, 255), 0, 255);
//convert the hue to a 24-bit color
uint32_t color = Wheel(hue);
//Go through each Pixel on the strip and set its color
for (int i=0; i<strip.numPixels(); i++)
{
//set pixel color
strip.setPixelColor(i, color);
}
//Display the new values
strip.show();
//sample delay
delay(100);
}
/* Helper functions */
//http://www.ladyada.net/products/rgbledpixel/
// Create a 24 bit color value from R,G,B
uint32_t Color(byte r, byte g, byte b)
{
uint32_t c;
c = r;
c <<= 8;
c |= g;
c <<= 8;
c |= b;
return c;
}
//Input a value 0 to 255 to get a color value.
//The colours are a transition r – g -b – back to r
uint32_t Wheel(byte WheelPos)
{
if (WheelPos < 85) {
return Color(WheelPos * 3, 255 – WheelPos * 3, 0);
} else if (WheelPos < 170) {
WheelPos -= 85;
return Color(255 – WheelPos * 3, 0, WheelPos * 3);
} else {
WheelPos -= 170;
return Color(0, WheelPos * 3, 255 – WheelPos * 3);
}
}
p.s the led strip i used has 35 led’s so if you have a longer strip you need to change the number value on this line of code to suit your own needs :)
Adafruit_NeoPixel strip = Adafruit_NeoPixel(35, 6, NEO_GRB + NEO_KHZ800);
In tutorial you said that you had used visual programming language. Pls send me, what Visual programming language you used to increase the frequency?
Hi! This is a very nice project. I was just wondering if it is possible to use Attiny85/84 instead of Uno? I tried to compile the code for Attiny85, but it gives errors. Maybe there is different library for Attinies?
Hi Jeremy,
I am trying to program Uno but I am getting fatal error etc no such file or directory complication terminated.
Error compiling.
Any ideas please?
Thanks,
Peter
Whoop! Finally completed my project with this video. Thanks so much, Jeremy, and thanks to everyone’s comments (even the cranky ones). I got a lot of help from Bill Sandidge at DecaturMakers.org (check us out if you are in Atlanta) and proudly showed – off my little project at Maker Faire Atlanta this year. In the middle of putting the circuit on a protoboard, I came upon an Adafruit Music Maker shield and fashioned an Ultrasound sensor in a skull to serve up some mp3 snippets to the op amp. Here are the links:
https://www.youtube.com/watch?v=Gv1IGuTeVFQ&feature=youtu.be
https://www.youtube.com/watch?v=pb-eQfNiYQU&feature=youtu.be
Thanks again, Jeremy and everyone!